

If your morning starts with the hurried clatter of a coffee shop queue, you’re missing out on one of life’s simplest yet most profound pleasures: the ritual of the perfect home brew.
Because here’s the truth – quality isn’t reserved for baristas behind marble counters or machines with five-figure price tags. The depth, texture, and harmony you love in your favorite cup can live right in your kitchen – brought to life by intention, technique, and a few thoughtful tools.
Welcome to the Zenoffe way: the journey from routine to ritual. A shift from simply drinking coffee to crafting a moment of calm, clarity, and sensory pleasure.
This guide is your invitation to slow down, explore, and experience coffee not as a habit – but as an art.
1. The Foundation: Mastering the Golden Ratio and the Grind
The biggest differentiator between home coffee and café coffee is consistency. Professionals use scales and precise measurements. You should, too. Forget scoops and eyeballing; accuracy is the first step to quality.
The Golden Ratio: Coffee to Water
Most specialty coffee shops adhere to a ratio known as the Golden Ratio, which is approximately 1:15 to 1:17. This means for every 1 gram of coffee, you use 15 to 17 grams of water.
Why it matters: This ratio provides the ideal balance of extraction. Too little coffee (too high a ratio) results in weak, under-extracted, and sour coffee. Too much coffee (too low a ratio) results in over-extracted, bitter, and harsh coffee.
Essential Tool: A digital scale that measures to the 0.1 gram. This is the single most important, and often cheapest, investment you can make for quality.
The Game-Changer: The Burr Grinder
A perfectly extracted cup starts with a consistent grind size. This is the one area where skimping on equipment will ruin your coffee every time. Those inexpensive blade grinders? They chop the coffee inconsistently, creating a mix of fine dust (which over-extracts and makes it bitter) and large chunks (which under-extracts and makes it sour).

You need a burr grinder, which crushes the beans to a uniform particle size.
| Brew Method | Ideal Grind Consistency |
|---|---|
| French Press | Coarse (sea salt) |
| Drip/Automatic Machine | Medium-Coarse (rough sand) |
| Pour-Over (V60/Chemex) | Medium (sand) |
| Espresso | Very Fine (powdered sugar) |
Zenoffe Tip: Always grind your coffee immediately before brewing. Coffee begins to lose its aromatics and flavor quality within minutes of being ground as the surface area is dramatically increased.
2. Choosing Your Brew Method: Precision and Flavor Profile
The equipment you use dramatically affects the final flavor profile. Here are three popular methods for café-quality results, ranked by initial investment and hands-on effort.
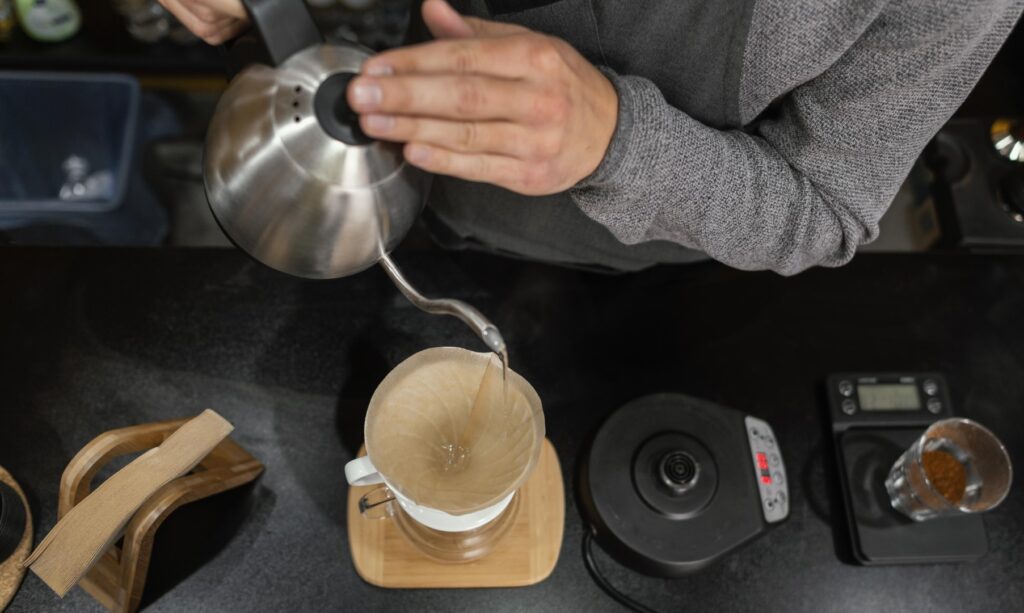
A. The Classic: Pour-Over (V60, Chemex)
The pour-over method is the choice of baristas for revealing the most clarity and subtlety in a bean’s flavor. It is a highly meditative and rewarding process.
Essential Equipment: Pour-over cone (V60 or Chemex), filters, and a gooseneck kettle.
The Technique:
1. Water Quality & Temperature: Use filtered water. The ideal temperature is between 93°C – 96°C. A temperature-controlled kettle is a huge bonus.
2. The Bloom: Pour just enough water (about twice the weight of your coffee) to wet all the grounds. Wait 30-45 seconds. This releases CO2, ensuring a more even flavor extraction on the main pour.
3. The Pour: Slowly and steadily pour the remaining water in small, continuous circles, working from the center outward, avoiding the filter paper walls. Aim for a total brew time of 3 to 4 minutes.
B. The Versatile Workhorse: AeroPress
The AeroPress uses a rapid, full-immersion process, resulting in a clean cup with low acidity. It’s incredibly versatile and forgiving, making it perfect for beginners who want a quality cup fast.
Essential Equipment: AeroPress, filters.
The Technique: Mix your coffee and hot water, steep for a short time (usually 1-2 minutes), and then use the plunger to push the coffee through the filter. The resulting concentrate is smooth and can be enjoyed as a small, espresso-like shot, or topped with hot water for an Americano, or milk for a quick latte.
C. The Immersion Favourite: French Press
For those who prioritize a heavy body and rich texture, the French Press is unbeatable. Because the grounds are fully submerged and strained through a mesh filter, oils and fine sediments remain, creating a luscious mouthfeel.
Essential Equipment: French Press brewer.
The Technique: Use a coarse grind to avoid filtering issues. Add coffee and water, stir once to ensure full saturation, then let it steep for 4 minutes. Gently and steadily press the plunger down. Crucially, pour immediately to stop the extraction process, which continues if the coffee is left in contact with the grounds.
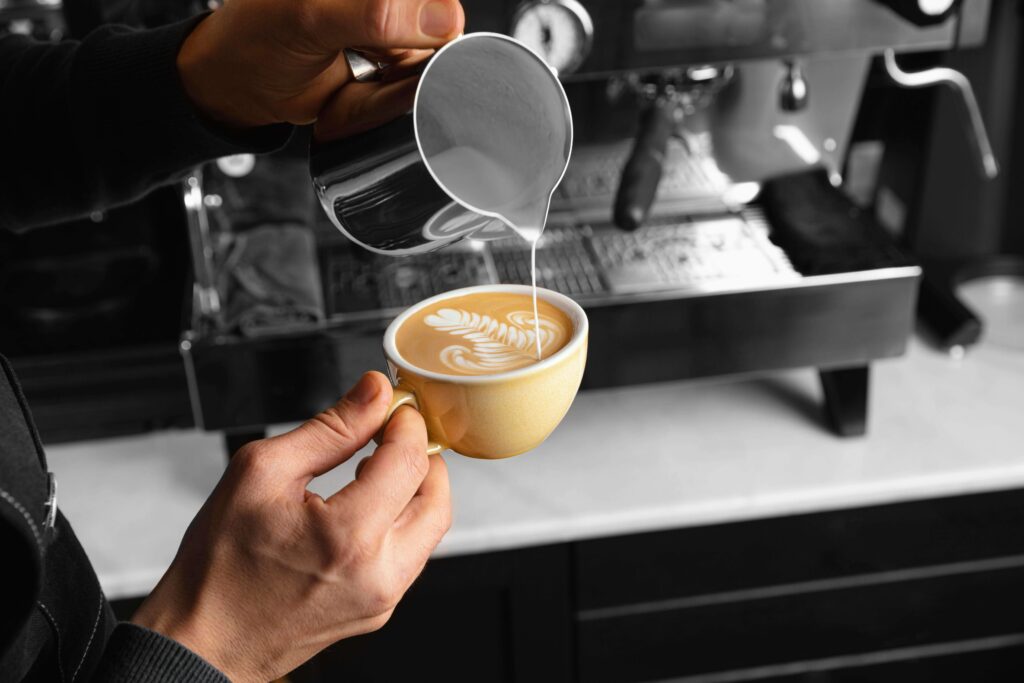
3. The Art of the Milk: Velvet Microfoam
A latte or cappuccino from a café is defined by its microfoam: a perfectly steamed milk texture that is sweet, glossy, and resembles wet paint. It’s what allows for latte art and, more importantly, enhances the taste and mouthfeel of the drink. Forget airy, dish-soap-like bubbles—we’re aiming for velvet.
Tools for the Task
You don’t need a professional steam wand to make excellent foam.
- Espresso Machine Steam Wand: The gold standard.
- Automatic Milk Frother: The most consistent and easiest option for hands-off foam.
- Handheld Electric Whisk/Frother: A small, inexpensive tool that works wonders with pre-heated milk.
- French Press: Pour hot milk into the press and rapidly pump the plunger for 30-60 seconds to create texture.
- Sealed Jar: Pour milk into a jar, secure the lid, and shake vigorously. Microwave to heat/stabilize the foam afterward.
The Microfoam Technique (The Three Phases)
This applies best to a steam wand or automatic frother, but the principles are key for all methods:
- Heating/Incorporating Air (The Stretching Phase): The initial, subtle “hissing” sound. Position the wand or frother just below the surface of the cold milk to introduce air, increasing the volume. Do this quickly, aiming for an increase of about 15-20% in volume.
- The Texturizing Phase (The Rolling Phase): Submerge the wand/frother just a bit more so that the milk is spinning in a continuous, smooth vortex. This breaks down the large bubbles created in Phase 1 into tiny, imperceptible microbubbles, creating the glossy texture.
- The Temperature Stop: Continue until the outside of your steaming pitcher (or the milk itself) is too hot to comfortably hold for more than a second or two (around 60°C – 68°C). Overheating burns the milk’s natural sugars, destroying its sweetness and making the foam unstable.
Zenoffe Milk Tip: For plant-based alternatives, choose brands labeled as “Barista Blend” or “For Coffee.” These have additives and fat content optimized for stability and frothing. Whole dairy milk is generally the easiest to steam due to its balance of fat and protein.
The Zenoffe Conclusion: Patience and Practice
Making café-quality drinks at home isn’t about expensive automation; it’s about respecting the ingredients and refining your process. It’s the Zenoffe principle applied to your morning ritual: find the calm in the craft.
It will take time to dial in your grind, to master the perfect water temperature, and to achieve that velvety microfoam. But with each cup, you’ll gain a deeper appreciation for the complex magic of coffee. Soon, you won’t be just making a drink; you’ll be creating an experience that is perfectly tuned to your own taste.
Now that you have the ultimate guide to home brewing, what’s the first café-quality drink you’re going to attempt? The classic Latte, a rich French Press, or a delicate Pour-Over?